
Wiring a GFCI Outlet with Diagrams
Wiring a Ground Fault Circuit Interrupter (GFCI) outlet is a common electrical task that can enhance the safety of your home by protecting against electrical shocks. Below is a step-by-step guide on how to wire a GFCI outlet, including diagrams for different scenarios.
Tools and Materials Needed:
- GFCI outlet
- Screwdriver
- Wire stripper
- Electrical tape
- Voltage tester
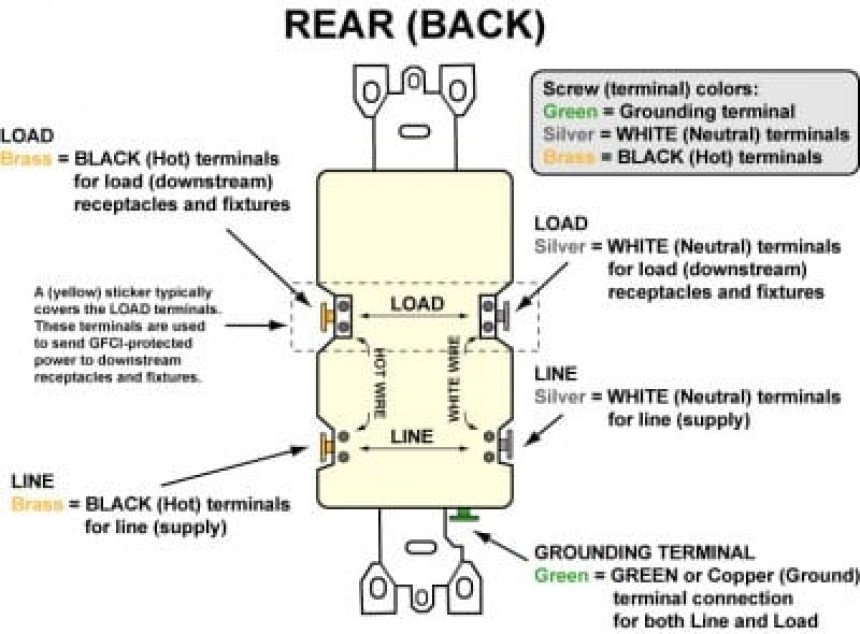
Understanding GFCI Terminals:
- Line Terminals: These terminals are where the incoming power supply connects. They are labeled "LINE" and are usually located at the bottom of the GFCI outlet.
- Load Terminals: These terminals provide GFCI protection to other outlets downstream. They are labeled "LOAD" and are usually located at the top of the GFCI outlet.
Diagram 1: Wiring a GFCI as a Standalone Outlet
Scenario: protecting only the GFCI outlet itself.
- Turn Off Power: Switch off the circuit breaker controlling the outlet.
- Remove Existing Outlet: Unscrew and pull out the existing outlet from the electrical box.
- Connect the line wires:
- Connect the black (hot) wire to the brass-colored "LINE" terminal.
- Connect the white (neutral) wire to the silver-colored "LINE" terminal.
- Connect the ground wire (bare or green) to the green ground screw on the GFCI.
- Cap the Load Terminals: If you are not connecting any downstream outlets, cover the load terminals with electrical tape.
- Install the GFCI Outlet: Carefully push the wires into the electrical box and secure the GFCI outlet with screws.
- Test the GFCI Outlet: Turn the power back on and press the "TEST" button on the GFCI. It should trip, cutting power to the outlet. Press "RESET" to restore power.
You May Also Like: Impact Driver vs Impact Wrench | Which Impact Tool Do You Need?
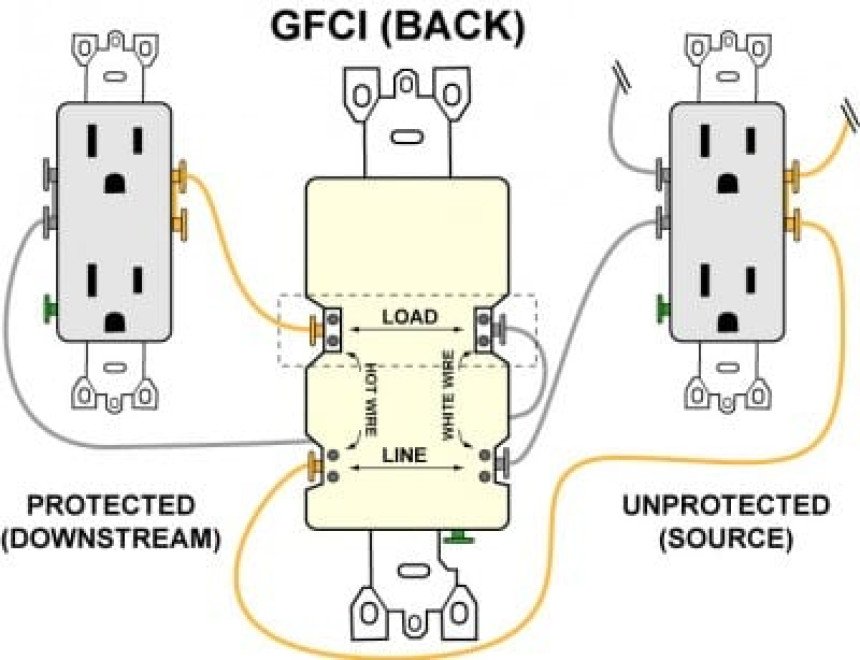
Diagram 2: Wiring a GFCI to Protect Additional Outlets

Scenario: protecting the GFCI outlet and additional outlets downstream.
- Turn Off Power: Switch off the circuit breaker controlling the outlet.
- Remove Existing Outlet: Unscrew and pull out the existing outlet from the electrical box.
- Connect the line wires:
- Connect the black (hot) wire from the power source to the brass-colored "LINE" terminal.
- Connect the white (neutral) wire from the power source to the silver-colored "LINE" terminal.
- Connect the ground wire (bare or green) to the green ground screw on the GFCI.
- Connect the load wires:
- Connect the black (hot) wire going to the downstream outlets to the brass-colored "LOAD" terminal.
- Connect the white (neutral) wire going to the downstream outlets to the silver-colored "LOAD" terminal.
- Install the GFCI Outlet: Carefully push the wires into the electrical box and secure the GFCI outlet with screws.
- Test the GFCI Outlet: Turn the power back on and press the "TEST" button on the GFCI. It should trip, cutting power to the outlet and all downstream outlets. Press "RESET" to restore power.
Note: This blog is only for learning purposes.
Diagram 3: Replacing a Regular Outlet with a GFCI Outlet
Scenario: Replacing an existing non-GFCI outlet with a GFCI outlet.
- Turn Off Power: Switch off the circuit breaker controlling the outlet.
- Remove the Existing Outlet: Unscrew and pull out the existing outlet from the electrical box.
- Identify the wires: Use a voltage tester to ensure the power is off. Identify the line and load wires (if any).
- Connect the line wires:
- Connect the black (hot) wire to the brass-colored "LINE" terminal.
- Connect the white (neutral) wire to the silver-colored "LINE" terminal.
- Connect the ground wire (bare or green) to the green ground screw on the GFCI.
- Connect the load wires (if any):
- If there are additional outlets downstream, connect the black (hot) and white (neutral) wires to the respective "LOAD" terminals.
- Install the GFCI Outlet: Carefully push the wires into the electrical box and secure the GFCI outlet with screws.
- Test the GFCI Outlet: Turn the power back on and press the "TEST" button on the GFCI. It should trip, cutting power to the outlet (and downstream outlets, if applicable). Press "RESET" to restore power.
Safety Tips:
- Always turn off the power at the circuit breaker before working on any electrical project.
- Double-check all connections before turning the power back on.
- Use a voltage tester to ensure that the power is off before touching any wires.
- If you are unsure about any step, consult with a licensed electrician.
Conclusion:
Wiring a GFCI outlet is a straightforward task that can significantly improve the safety of your home. Whether you're installing it as a standalone outlet or using it to protect additional outlets downstream, following these steps and diagrams will help you complete the job correctly and safely.
Chop Saw vs Miter Saw: Which One is Right for Your Project
Chop saws and miter saws are both essential tools in woodworking and metalworking, but the...
Innovative Tools from Brands You Might Not Recognize
There's an explanation famous brands are in this way, all things considered, well known. T...
Best Drill Bits for Metal for 2024
We previously composed our viewpoints on the best boring apparatus generally speaking — co...
Best Miter Saws of 2024 – 5 Top Models Tested
Looking for the best miter saws of 2024? Our expert team has tested and reviewed the top 5...
